

Subjects Covered:
- Meter to Yard Conversions
- H&K Diopter Sights Essentials
- Tools Necessary To Adjust H&K Rear Diopter Sights
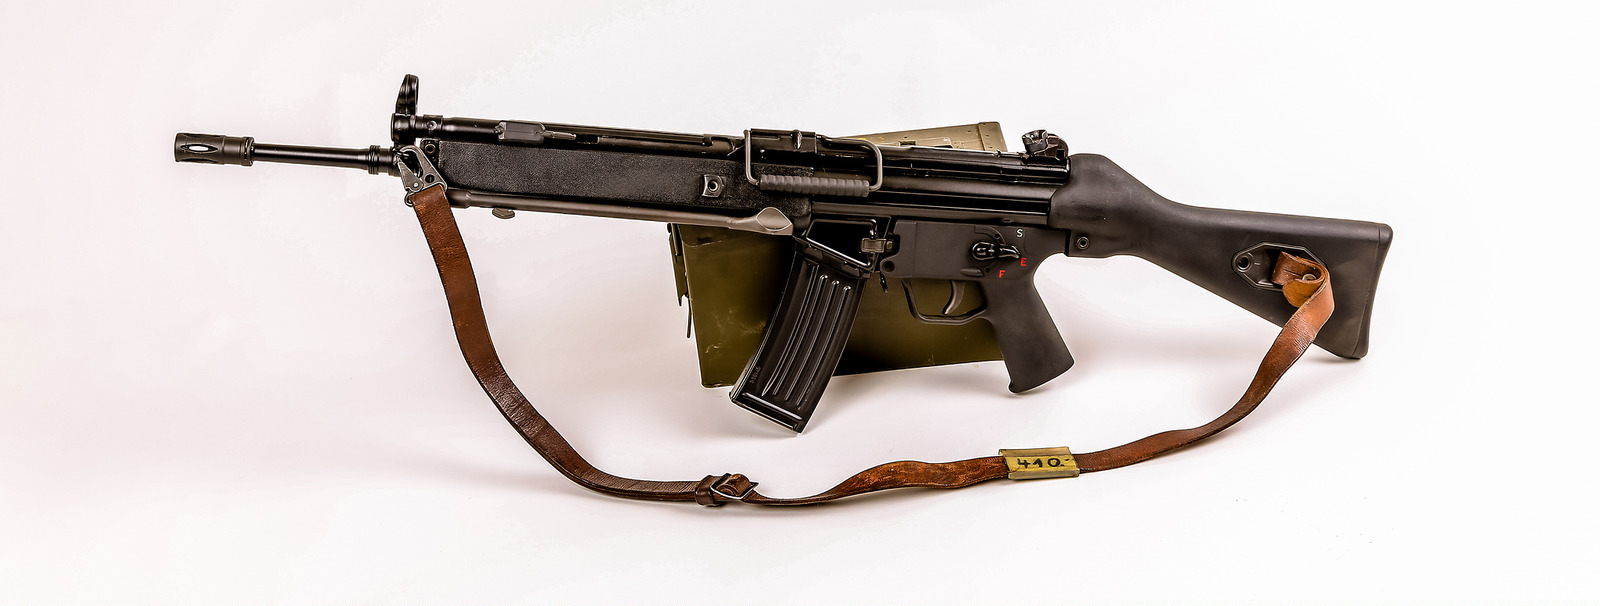
- HK G-3 / HK-91 / PTR-91 — 7.62x51mm NATO
- HK-93 / HK-53 / HK-33 — 5.56x45mm NATO
- HK MP5 / HK-94 — 9mm NATO
- H&K Diopter Sight Elevation Adjustments Using The H&K Tool or Snap-Ring Pliers
For Future Reference:
- POA = point-of-aim.
- POI = point-of-impact.
- 30 meters = 33 yards.
- 100 meters = 109 yards.
- 200 meters = 218 yards.
back to top
H&K Diopter Sights Essentials:
The HK G3 or HK-91 sight is calibrated for standard 145 to 150 grain M80 ball ammunition.
The front sight post is non-adjustable.
Zeroing the rifle is accomplished with the rear sight which is adjustable for windage and elevation using thin, needle nose pliers and a Phillips screwdriver.
The rear sight has four positions to select from. The large V-notch “1” setting provides an unobstructed view for CQB style, close-range, snapshot shooting. With the V-notch it is easy to maintain target acquisition while running & gunning, shooting from a moving vehicle, during rapid fire, or in low light.
 In low-light conditions fill the V-notch with the front sight ring as pictured to the right. In low light the ring will remain visible even after the front sight post has disappeared. The V-notch is found only on full-size G3 / HK-91 style rifles and not on MP5 submachine guns.
The “1” setting is not a 100 meter setting as one might be led to believe. The V-notch “1” setting and the 200 meter setting “2” have the same point of aim. Where the V-notch provides easy target acquisition at close range and with rapid fire shooting, the “2” setting’s peep-sight increases the depth of focus and makes the sight picture much sharper when aiming at further distances. When the G3 or HK-91 is properly zeroed and the rifle’s sight set to the “2” setting, the bullet’s trajectory will provide a near zero of 30 meters. This means that when you initially zero your rifle you can use the “2” setting and then zero at 30 meters. You can then verify zero at 200 meters. After zeroing your rifle for 30/200 meters with the “2” setting, the rifle will be zeroed at 300 meters with the “3” and 400 meters with the “4” setting. The proper sight picture for using the “2”, “3”, and “4” settings are illustrated below.

Tools Necessary To Adjust H&K Rear Diopter Sights:
To adjust Diopter sights you will need the following tools:
- H&K sight adjustment tool or snap ring pliers.
- #2 Philips head screwdriver.
back to top
HK G-3 / HK-91 / PTR-91 — 7.62x51mm NATO:

As discussed earlier, H&K G3 and clone rear sights have a setting for close range CQB shooting, and peep settings for 200 meters, 300 meters, and 400 meters.
When properly zeroed, the H&K G3 has the same POA/POI at 30 meters (33 yards) and 200 meters using 7.62x51mm NATO ammunition, so the easiest technique is to zero at 30 meters with the “2” setting, and then verify your zero at 100 meters with the “1” setting.
Windage Adjustment Technique:
- Set up a target at 30 meters from the muzzle of the rifle.
- Set the rear sight drum to the “2” position.
- Fire a 3-5 round test group from a rested position (beanbag, bipod, etc.). Adjust sights to move your shot group towards your point-of-aim. Shoot another test group. Repeat as necessary until point-of-aim = point-of-impact.
- Loosen the clamping screw with a #2 Phillips screwdriver and turn the adjusting screw the desired amount of ¼ turns. When adjusting the sights on any type of weapon, remember the acronym FORS: Front Opposite, Rear Same. Since all sight adjustments with H&K Diopter sights are made with the rear sight, move your sight in the same direction as you want your bullet group to move. Turning the adjusting screw clockwise moves the POI left, counterclockwise moves the POI right.
- For the G-3 / 91 series of rifles, turning the adjustment screw 1/4 turn will laterally shift POI 1.29″ (3.3 cm) at 100 meters.
Elevation Adjustment Techniques:
- The mechanical method to adjust elevation with H&K style diopter style sights with an H&K rear sight tool or inexpensive snap-ring pliers is discussed further in this section.
- For the G-3 / 91 series of rifles, turning the sight cylinder 1/4 turn will raise or lower POI 1.29″ (3.3 cm) at 100 meters.
back to top
HK-93 / HK-53 / HK-33 — 5.56x45mm NATO:

Windage Adjustment Technique:
- Range: Coming soon.
- Fire a 3-5 round test group from a rested position (beanbag, bipod, etc.). Adjust sights to move your shot group towards your point-of-aim. Shoot another test group. Repeat as necessary until point-of-aim = point-of-impact.
- Loosen the clamping screw with a #2 Phillips screwdriver and turn the adjusting screw the desired amount of ¼ turns. When adjusting the sights on any type of weapon, remember the acronym FORS: Front Opposite, Rear Same. Since all sight adjustments with H&K Diopter sights are made with the rear sight, move your sight in the same direction as you want your bullet group to move. Turning the adjusting screw clockwise moves the POI left, counterclockwise moves the POI right.
- For the 93 / 53 / 33 series of rifles, turning the adjustment screw 1/4 will laterally shift POI 1.6″ (4 cm) at 100 meters.
Elevation Adjustment Techniques:
- The mechanical method to adjust elevation with H&K style diopter style sights with an H&K rear sight tool or inexpensive snap-ring pliers is discussed further in this section.
- For the 93 / 53 / 33 series of rifles, turning the sight cylinder 1/4 will raise or lower POI 1.6″ (4 cm) at 100 meters.
back to top
HK MP5 / HK-94 — 9mm NATO:

The H&K MP5 / 94 has the same POI at 25 and 75 meters using 9mm NATO ammo.
Windage Adjustment Technique:
- Set up a target at 25 meters from the muzzle of the rifle.
- Set the rear sight drum to any desired aperture (smallest will give you the most precision and least margin of error).
- Fire a 3-5 round test group from a rested position (beanbag, bipod, etc.). Adjust sights to move your shot group towards your point-of-aim. Shoot another test group. Repeat as necessary until point-of-aim = point-of-impact.
- Loosen the clamping screw with a #2 Phillips screwdriver and turn the adjusting screw the desired amount of ¼ turns. When adjusting the sights on any type of weapon, remember the acronym FORS: Front Opposite, Rear Same. Since all sight adjustments with H&K Diopter sights are made with the rear sight, move your sight in the same direction as you want your bullet group to move. Turning the adjusting screw clockwise moves the POI left, counterclockwise moves the POI right.
- For the MP5 / 94 series of submachine guns, turning the adjustment screw 1/4 turn will laterally shift POI .51″ (1.37 cm) at 25 meters.
Elevation Adjustment Techniques:
- The mechanical method to adjust elevation with H&K style diopter style sights with an H&K rear sight tool or inexpensive-snap ring pliers is discussed further in this section.
- For the MP-5 / 94 series of submachine guns, turning the sight cylinder 1/4 turn will raise or lower POI .55″ (1.37 cm) at 25 meters.
back to top
H&K Diopter Sight Elevation Adjustments:
Using The H&K Tool:
- Insert the elevation adjustment tool into the rear sight cylinder in such a manner that the wedges of the tool engage the two splines in the cylinder that contains the catch bolts.
- Now press the Philips-head screwdriver into the adjustment tool and hold firmly. You can now rotate the rear sight cylinder the desired amount of ¼ turns.
- For the G-3 / 91 series of rifles, turning the sight cylinder 1/4 turn will raise or lower POI 1.29″ (3.3 cm) at 100 meters.
- For the 93 / 53 / 33 series of rifles, turning the sight cylinder 1/4 will raise or lower POI 1.6″ (4 cm) at 100 meters.
- For the MP-5 / 94 series of submachine guns, turning the sight cylinder 1/4 turn will raise or lower POI .55″ (1.37 cm) at 25 meters.
Don’t waste your money on an expensive H&K sight adjustment tool. Instead, use an inexpensive set of snap ring pliers discussed next and save your money to buy ammunition.
H&K Diopter Elevation Adjustments Using Snap Ring Pliers:
 Do not waste your money on an expensive H&K sight adjustment tool. I used a $6 pair snap ring pliers from Harbor Freight (seen right). They work perfect. You can pick these up at any tool store. Some store will be less expensive than others. There is no reason to purchase an expensive pair. Unless you are planning on using this for other jobs involving snap rings, you will only need to use this tool one time, so just get the cheap one. Read the following directions and watch the video about how to adjust H&K rear sights.
Procedure:
- Use the snap ring pliers to press in the catch bolts.
- You can now rotate the rear sight cylinder the desired amount of ¼ turns as described above.
- Make sure the catch bolts re-engage the splines after the adjustment is done.
- Turn the sight drum to the desired aperture.
back to top


thank you for posting this!
My service weapon is a model of G3 with picatinny rails. During peace time we’re not allowed to add non issued optics, but during deployment the rules are different. So I’m looking around for a scope. Could I ask you what the sight height is for a G3 with magnifying scope?
I’m asking since I can’t measure it myself at this time, and I’m making ballistic tables to compare the BDC reticles of various scopes to the actual ballistics of a G3.
LikeLike
That would depend on the type of sight and the sight mount or rings. Not enough information to answer that question.
LikeLike
I have a question. My ptr has diopter sights. The turn on it is very harsh and it bites my fingers when it finally gives and squishes me between the vertical backing posts of the drum sight. That’s one problem, but the worse problem to me is that the sight wobbles when its properly set on any number like 1,2,3,4.
For instance, if I rotate it to 2, it clicks in and its stiff, but I can use a twist motion and it will shift left or right by 0.5mm to 1.0mm. This means that if I were to move the sight to 3 from 2, it might be off to the right, and so cause me to shoot more right, and if I switch from 2 to 3, it will land off to the left. I can use my brain and say that I switch the number, and then go back and twist it to either left or right to bottom it out in the pit that holds it in place on one side, and then use windage to make it shoot centered, and always work with that, but is there a better way to solve this so that when it clicks into place at any number its always dead-centered and can’t wiggle left or right?
LikeLike
send it back for repairs or just replace the rear sight
LikeLike
Great article.. just technical enough to get the job done. Thank you.
LikeLike